Metro Heating and Cooling, Inc.


Click Here to go to our Secure Website: https://coolermetro.com
|
Metro Heating and Cooling, Inc. |
|
|
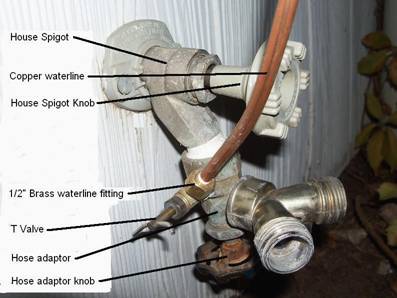
How to shut down your cooler: Freeze Warning! These are the steps you should take to winterize your cooler. (The first three steps are from the ground and will help minimize any freeze damage.)Step 1: Turn off the water to the cooler. There is a copper (usually) waterline, about the diameter of a pencil, that runs from the cooler to the hook-up location. If your waterline is connected to a spigot adaptor, remove your hose(s). Leave the T valve open. Instead, turn off the house spigot knob…It was supposed to be on all summer. Then turn on the hose spigot adaptor knob all the way. If you have a spigot adaptor, you may remove it and store it in the cooler for next season. The cooler waterline may be hooked up to a sprinkler pipe (or possibly a pipe indoors) with a saddle valve that has a T handle. If so, turn the T valve until it is completely closed.Step 2: Loosen the copper line. If your water is hooked up to a T valve instead of a spigot adaptor, you must undo the copper line to allow the water to drain. Copper lines can usually be loosened with a small adjustable wrench and a ½” wrench. If you can't get it loose from the spigot adaptor, at least do the next step to minimize any freeze danger.Step 3: Turn on your cooler at the thermostat. Set the cooler to run in the cool mode with the pump on. This will allow the float seal to relax and relieve the pressure/vacuum in the waterline. Some water may run out of the tube at this time. The rest of the steps listed below require roof access. The idea is to run the cooler for long enough to initiate the pre-cool cycle, allowing the float and solenoid valves to open. On AeroCool ProStats, press the “drain” button, wait 2 minutes, then shut off your thermostat power button. On BreezAir coolers with AutoDrain systems, turn off the thermostat with the power button. Your cooler will automatically drain 3-4 hours after power-off, or you can follow the steps below. The rest of the steps listed below require roof access. See Step 6 regarding draining.Step 4: Disconnect the waterline at the cooler. Try not to disturb the float alignment or loosen the float fittings, only the waterline fitting.Step 5: Blow the waterline out to remove all the water. Reconnect it at the cooler. Leave it disconnected at the hookup source.Step 6: Drain the cooler. On metal coolers and older BreezAir coolers drain the cooler by removing the drain stem. Leave the drain in the cooler for next season. On BreezAir coolers with auto drains, do not remove the drain. Instead, drain the cooler by pushing the drain button on a remote controlled BreezAir cooler. For BreezAir EXV series coolers with a wall control, turn off the cooler, then press the up and down arrows at the same time for about 5 seconds. Your stat will flash “dr”.Step 7: Turn off the disconnect, on/off switch, control box or remove the plug in motor and pump plugs so the cooler is not accidentally turned on.Step 8: Remove the belt and leave it in the cooler for next season. If your bearings and/or motor have oil ports, oil them now with a few drops of oil.Step 9: Spray the cooler to remove salt/mineral deposits, leaves, dirt and debris. Try to avoid getting water into the blower or you may get water inside the duct and possibly your house.Step 10: Install your cover or block off plates and close your inside vents.FOR SPRING START-UP, REVERSE THESE DIRECTIONS. |
|
Send mail to
Coolersonline@Hotmail.com with
questions or comments about this web site.
|